August 2010August 2010 August 2010 August 2010

Reset manual hp cina

Monday, August 30, 2010

buat koleksi para juragan....monggo..

GENERAL CHINESE MODELS CODE :
default user code: 1122, 3344, 1234, 5678
Engineer mode: *#110*01#
Factory mode: *#987#
Enable COM port: *#110*01# -> Device -> Set UART -> PS Config -> UART1/115200
Restore factory settings: *#987*99#
LCD contrast: *#369#
software version: *#800#
software version: *#900#
set default language: *#0000# Send
set English language: *#0044# Send
set English language (new firmware): *#001# Send

Other Secret Codes ,Chinese Models...
--------------------------------------------------------------------------------
Service codes Samsung :
E900 software version: *#5002*8376263#
E900 full reset: *2767*3855#
Service codes Spice:
S404 enable COM port: *#42253646633# -> Device -> Set UART -> PS -> UART1/115200
S410 engineer mode: *#3646633#
S900 software version: *#8375#
S900 serial no: *#33778#
Service codes Philips:
S200 enable COM port: *#3338913# -> Device -> Set UART -> PS -> UART1/115200
Service codes "Chinese" models:
default user code: 1122, 3344, 1234, 5678
Engineer mode: *#110*01#
Factory mode: *#987#
Enable COM port: *#110*01# -> Device -> Set UART -> PS Config -> UART1/115200
Restore factory settings: *#987*99#
LCD contrast: *#369#
software version: *#800#
software version: *#900#
Service codes BenQ:
Article Source: Forum Komunitas Teknisi Ponsel Indonesia Kode reset hp cina
software version: *#300#
test mode: *#302*20040615#
Service codes Pantech:
software version: *01763*79837#
service menu: *01763*476#
reset defaults (phone/user code reset to default): *01763*737381#
Service codes VK-Mobile 3xx, 5xx :
Article Source: Forum Komunitas Teknisi Ponsel Indonesia Kode reset hp cina
software version: *#79#
software version: *#837#
service menu: *#85*364# (hold #)
Service codes VK200, VK2000, VK2010, VK2020, VK4000:
software version: *#79#
service menu: *#9998*8336# (hold #)
reset defaults (phone/user code reset to default): *#9998*7328# (hold #)
Service codes LG :
software version: 2945#*#
KG300 NVRAM format: 2945#*# -> menu 15
Service codes Sony-Ericsson:
J100 software version: #82#
Service codes Fly:
M100 software version: ####0000#
2040(i) reset defaults: *#987*99# Send
MX200 reset defaults: *#987*99# Send
MX200 software version: *#900# Send
SL300m reset defaults: *#987*99# Send
SL300m software version: *#900# Send
SL500m reset defaults: *#987*99# Send
SL500m software version: *#900# Send
MP500 reset defaults: *#987*99# Send
MP500 software version: *#900# Send
Set language to English: *#0044#
Set language to Russian: *#0007#
Service codes Konka :
C926 software version: *320# Send
C926 set default language: *#0000# Send
C926 set English language: *#0044# Send
Service codes GStar :
GM208 (Chinese Nokea 6230+) engineering menu: *#66*#
Set language to English: *#0044#
Set language to Russian: *#0007#
Service codes Motorola :
Motofone F3 software version: **9999* Send
C113, C114, C115, C115i, C116, C117, C118 software version: #02#*
C138, C139, C140 software version: #02#*
C155, C156, C157 software version: #02#*
C257, C261 software version: #02#*
V171, V172, V173 software version: #02#*
V175, V176, V176 software version: #02#*
C168, W220 software version: *#**837#
W208, W375 software version: #02#*
E900 software version: *#5002*8376263#
E900 full reset: *2767*3855#
Service codes Spice :
S404 enable COM port: *#42253646633# -> Device -> Set UART -> PS -> UART1/115200
S410 engineer mode: *#3646633#
S900 software version: *#8375#
S900 serial no: *#33778#
Service codes Philips:
S200 enable COM port: *#3338913# -> Device -> Set UART -> PS -> UART1/115200

Tips merawat handphone

Tips merawat batrei hp sangat penting karena bagaimanapun canggihnya hp anda, dan secanggih apapun sofware hp anda, kalo batarinya drop akan susah juga, bahkan bisnis bisa melayang, gebetan bisa pindah ke lain hati, dan konflik bisa terjadi karena masalah sepele saat telpon, batreinya habis padahal baru di cas. Simak yang ini, kalo mau sumbang tips silahkan!

  • Jika anda sedang mengecas baterei, sebaiknya ponsel dlm keadaan mati. Jika ponsel menyala akan terjadi arus keluar masuk secara bergantian yang akibatnya akan merusak molekul dalam baterai. Ini juga akan mengakibatkan terjadinya memori effect pada baterai. Apalagi saat kita mencharge, lantas ponsel digunakan untuk koneksi, itu akan menambah beban pada proses kimia dalam baterai.
  • Kurangi menerima atau menelfon di dalam mobil. Karena pada saat itu dia berusaha keras mencari sinyal dari BTS terdekat. Ketika kita bergerak menjauh dari BTS maka pada saat itu dia berusaha mencari sinyal pada BTS yang lebih dekat. Aktivitas seperti itulah yang memakan energi baterai lumayan besar. Apalagi kita melakukan koneksi internet dalam kondisi bergerak dengan kecepatan tinggi.
  • Saat akan mencharge baterai ponsel, sebaiknya ponsel di keluarkan dari leather case / sarung / kondom handphone karena pengecasan baterai dapat menimbulkan panas yang bisa saja dapat menyebabkan umur ponsel dan baterai anda menurun.
  • Jangan sering-sering chargering di mobil. Saat mengisi baterai dalam kendaraan, kita menggunakan pemantik api sebagai sambungan. Voltase pada kendaraan sering tidak stabil, sehingga dapat mengakibatkan tidak stabilnya arus masuk ke dalam baterai.( kalo mobil Ferari gimana ya belum pernah nyobak sih he..he)
  • Jika umur baterai telah lebih dari enam bulan, sering-sering lah membersihkan pin dan Connector baterai dengan cotton bud atau tissue.
  • Matikan fungsi-fungsi yang tidak penting dan tidak perlu untuk di gunakan. Misalnya Bluetooth, kamera aktif, vibrate, GPRS, sering menyalakan led badan ponsel, screensaver yang cepat, mengaktifkan backlight siang hari, sering buka tutup sliding, dan multitasking.
  • Berhematlah saat anda mengaktifkan MP3, radio, Bluetooth dan bermain games.
  • Jangan biasakan maen hape di dalam kamar mandi tanya kenapa? soalnya bisa jatuh dan rawan kena air.
  • Jangan biasakan meletakkan hanphone di saku baju depan tanpa tali hp, bisa jatuh kalo lagi membungkuk. Juga jangan di saku celana depan, karena kata pakar sih, dalam jangka lama, bisa menyebabkan kemandulan hih serem..terus di letakkan di mana?
  • Jangan terlalu banyak di masuki video 3gp porno, soalnya bikin ketagihan dan konsumsi batari cepat habis dan akhirnya harus di cas ulang, padahal tiap handpone kebanyakan memiliki umur tertentu.
  • Mohon dijaga dari jangkauan anak kecil, soalnya bisa di banting itu hape.

Melindungi Konten Feed Wordpress Dari Pencuri Konten

Jika anda seorang blogger yang sedang kesel and nyolot, karena konten blog anda di curi secara rutin setiap kali meluncurkan artikel, mungkin sejumlah tip dari saya dapat membantu. Tentu tidak ada seorang pun yang sudi kerja kerasnya di ambil begitu saja oleh orang lain, terlebih lagi malah mendapat rugi sedangkan mereka mendapat untung, sudah begitu boro-boro dapat terima kasih
Nah dari pada hanya kesel mending mengambil tindakan nyata dengan melakukan perlindungan terhadap konten anda atau bahkan melakukan serangan balik yang berdampak di hukum-nya pihak pencuri artikel anda.

Lalu kenapa harus melindungi artikel kita? Karena seringkali blog halaman si pencuri malah lebih bagus di hasil pencarian Google, di banding halaman blog kita sendiri, ini dikarenakan Google “terkadang” salah menilai antara – halaman mana yang menduplikasi – dan halaman mana yang di duplikasi. Jika halaman kita terdeteksi sebagai halaman yang menduplikasi maka posisi halaman kita berada di bawah si pencuri.
Berikut ini saya uraikan sejumlah langkah untuk melindungi konten blog anda juga memberi pelajaran kepada si pencuri (jika anda mau) dengan begitu, setidaknya kita tidak hanya menjadi korban, oke inilah dia:
Tindakan perlindungan:
Walaupun banyak teknik dan cara melindungi feed konten dari scapper namun saya rasa ke 2 cara ini sudah cukup, setidaknya tidak mubazir, namun jitu.
1. Pastikan memilih Summary pada menu feed, mungkin pilihan ini tidak mengenakan bagi mereka yang lebih suka membaca konten blog lewat Feed karena jadinya sepotong-sepotong, namun mau bilang apa karena feed telah di salah gunakan oleh oknum tertentu, ok untuk memilih Summary anda ke Settings -> Reading, lihat bagian For each article in a feed, show kemudian klik “Summary”
Manfaatnya: Artikel anda tidak terpublish seluruhnya di blog pencuri, mau tidak mau harus “read more” ke artikel asli.
2. Gunakan plugin RSS Footer, sempurnakan cara diatas dengan plugin ini, karena biarpun feed anda di set Summary namun si pencuri feed umumnya memberi atribut Nofollow ke link artikel anda atau sama sekali tidak melink artikel anda, sehingga Google tidak dapat mendeteksi bahwa link andalah yang asli, oleh karenanya plugin ini akan memberi link di setiap posting di feed anda.
Perlu di ketahui bahwa memberi link pada setiap potongan posting anda di halaman feed sangat di rekomendasikan untuk menentukan halaman mana yang asil menurut Matt Cutts:
“…if the syndicated article has a link to the original source of that article, then it is pretty much guaranteed the original home of that article will always have the higher PageRank, compared to all the syndicated copies. And that just makes it that much easier for us to do duplicate content detection and say: “You know what, this is the original article; this is the good one, so go with that.” Sumber.
Sebagai contoh klik di feed ini, dan dapat di lihat tepat di setiap bagian bawah judul posting ada tulisan seperti ini:
judul posting (berserta link halaman) adalah salah satu artikel di: Abi Bakar Blog (link homepage)
Manfaatnya: Jika konten feed rekan di curi maka link halaman berserta link homepage rekan akan tampil di seluruh halaman blog si pencuri konten feed. Dengan gini Google akan mendeteksi bahwa halaman anda yang asli plus akan menambahkan banyak backlink ke blog anda.
Download Plugin RSS Footer di sini.
Menghukum si pencuri konten:
Anda bisa melakukan tindakan hukum dengan melaporkan ke Google bahkan ke pihak Adsense jika mereka memasang Adsense.
1. Laporkan ke Google, walaupun memerlukan waktu lama dan terkadang membuat frustrasi karena lama menunggu, namun tidak ada salahnya mencoba. Laporkan ke Google, anda juga dapat menulis DMCA (Digital Millennium Copyright Act) untuk melaporkan splog, namun di perlukan usaha lebih, yakni dengan menulis pengaduan lalu mengirimkannya via fax dan cara ini jauh lebih cepat, untuk panduan silahkan ke sini.
2. Laporkan ke Feedburner dari blog si pencuri di sini, namun anda harus login terlebih dulu ke Feedburner.
3. Laporkan pihak hosting tempat blog si pencuri, biasanya blog splog (spam blog) menutup whois domain sehingga hosting blog mereka tidak terdeteksi, jika begitu gunakan layanan deteksi domain bernama:
Semoga bermanfaat dan sampai jumpa diposting berikutnya!

Menjadikan blog wordpress seo friendly

Saya adalah penggemar berat plugin All In One SEO Pack, saking ngefans sama plugin ini maka hampir di semua blog WP saya pasangin plugin ini, hingga sempat menulis tutorial optimalkan plugin SEO Pack ini, namun tentu saja keberadaan plugin – betapapun dahsyat peranannya – mempunyai efek kurang baik bagi kinerja database, oleh karenanya sekarang ini saya lebih memilih menggunakan php code sebagai alternatif plugin, namun realisasinya baru pada blog-blog saya yang masih baru
Karena keberadaan plugin memperbanyak hitungan database querry dan berefek pada faktor keamanan JIKA plugin tersebut tidak lagi di urus oleh empunya sehingga membuka celah bagi script jail
Blog yang rekan baca contohnya tidak menggunakan plugin SEO Pack, juga beberapa blog saya yang lain, biarpun tidak menggunakan plugin, blog ini teroptimasi sama seperti menggunakan AIOSP
Seperti kita ketahui, bahwa AIOSP mengoptimasi beberapa faktor:
1. Meta deskripsi tiap halaman, bisa secara otomatis atau di tulis sendiri
2. Keyword tag di tiap halaman
3. URL Canonical
4. No-index pada arsip, kategori dan tag (kalau ini tergantung pilihan)
5. Seting struktur Judul
Sebenarnya tanpa plugin All In One SEO Pack atau plugin sejenis, kita dapat memiliki faktor-faktor diatas, dengan cukup menambahkan beberapa PHP Code dan contohnya bisa dilihat pada blog ini, jika di View Source di bagian bawah title akan tampak meta deskripsi dan title:

1. Tampilkan Meta Deskripsi di tiap artikel
Nah untuk menampilkan meta deskripsi letakan kode berikut di header.php di bagian bawah atau setelah tag <title> :
<?php if (is_single() || is_page() ) : if ( have_posts() ) : while ( have_posts() ) : the_post(); ?>
<meta name="description" content="<?php the_excerpt_rss(); ?>" />
<?php endwhile; endif; elseif(is_home()) : ?>
<meta name="description" content="<?php bloginfo('description'); ?>" />
<?php endif; ?>

Maka setiap artikel kita memiliki meta deskripsi, yang di ambil kutipan RSS, dan kode ini akan mengambil kutipan paragraf pertama secara otomatis, sehingga setelah anda publish artikel maka meta deskripsi akan langsung muncul
Namun anda pun bisa “Rewrite” deskripsi dengan menuliskannya seperti juga di All In One SEO Pack, yaitu menulis deskripsi di bagian box excerpt seperti gambar berikut ini:
2. Tampilkan Meta Keyword Di Tiap Halaman
Dan untuk menampilkan keyword dari “Post Tags” di tiap artikel, maka masukin kode ini di bagian “Function.Php” sebelum tag ?> penutup, begini:
function csv_tags() {
$posttags = get_the_tags();
foreach((array)$posttags as $tag) {
$csv_tags .= $tag->name . ',';
}
echo '<meta name="keywords" content="'.$csv_tags.'" />';
}

Lalu, masukan kode ini <?php csv_tags(); ?> di bagian header dan satukan dengan kode meta deskripsi diatas, jadi bentuk komplitnya seperti ini:
<?php if (is_single() || is_page() ) : if ( have_posts() ) : while ( have_posts() ) : the_post(); ?>
<meta name="description" content="<?php the_excerpt_rss(); $post_desc_length = 20; ?>" />
<?php csv_tags(); ?>
<?php endwhile; endif; elseif(is_home()) : ?>
<meta name="description" content="<?php bloginfo('description'); ?>" />
<?php endif; ?>

3. Meta Keyword di halaman Home atau Homepage,
Untuk keyword yang hanya tampil di homepage bisa tambahkan tag berikut ini:
<meta name="keywords" content="Keyword1, Keyword2, Keyword3" />
Jadi bentuk keseluruhannya seperti ini
<?php if (is_single() || is_page() ) : if ( have_posts() ) : while ( have_posts() ) : the_post(); ?>
<meta name="description" content="<?php the_excerpt_rss(); $post_desc_length = 20; ?>" />
<?php csv_tags(); ?>
<?php endwhile; endif; elseif(is_home()) : ?>
<meta name="description" content="<?php bloginfo('description'); ?>" />
<meta name="keywords" content="Keyword1, Keyword2, Keyword3" />
<?php endif; ?>

Terima kasih untuk Nathan atas tricknya ini
4. Menggunakan Robots.txt Untuk NO Index Arsip, Kategori, Tag dan lainnya
Jika kita ingin “no-index” folder atau file, cukup membuat file robots.txt dengan notepad atau text editor pilihan anda, kemudian masukan nama-nama file yang tidak ingin di index Google seperti ini:
User-agent: *
Disallow: /cgi-bin
Disallow: /wp-admin
Disallow: /wp-includes
Disallow: /wp-content/plugins
Disallow: /wp-content/cache
Disallow: /wp-content/themes
Disallow: /archives/
Disallow: /wp-
Disallow: /comments/feed/
Disallow: /trackback
Disallow: /feed
Disallow: */trackback
Disallow: */feed
Disallow: /*?*
Disallow: /*?
Allow: /wp-content/uploads
# Google Image
User-agent: Googlebot-Image
Disallow:
Allow: /*
# Internet Archiver Wayback Machine
User-agent: ia_archiver
Disallow: /
# digg mirror
User-agent: duggmirror
Disallow: /
Kemudian upload ke root direktori
Kita bisa mendapatkan refrensi lebih jauh tentang robots.txt untuk Wordpress di Codex
5. Kanonikal URL?
Tidak usah pusing, untuk memiliki kanonikal url, anda cukup upgrade ke Wordpress 2.9 ke atas maka secara otomatis akan memiliki kanonikal url seperti ini pada view souce
<link rel='canonical' href='http://abibakarblog.info/apakah-google-mengindeks-2-link-sama-dalam-1-artikel.html' />
6. Judul Blog dan Artikel SEO friendly
Satu lagi dari area plugin SEO Pack yang dapat kita gunakan tanpa plugin itu, ialah mengedit Tag judul dengan tag yang lebih SEO friendly seperti ini:

<?php wp_title(' '); ?> <?php if(wp_title(' ', false)) { echo ' : '; } ?><?php bloginfo('name'); ?>

Dan banyak blogger yang sudah memberi tutorial untuk itu salah satunya Rsimaka anda dapat lihat tipsnya di Tag Judul Yang SEO Friendly
7. Beres!
Sekarang tiap artikel Wordpress kita memiliki meta deskripsi dan keyword yang unik juga url kanonikal plus judul, tanpa menggunakan plugin All In One SEO Pack atau plugin yang mempunyai fungsi sama
Bug:
Cara ini bentrok jika anda menggunakan plugin related post bernama YARPP (Yet Another Related Post Plugin), karena judul-judul dari YARPP akan tampil di meta deskripsi, jika rekan ingin gunakan cara ini namun tetap ingin tampilkan related post, maka harus non-aktifkan Plugin YARRP dan gunakan plugin lain yang berfungsi sama, atau gunakan Kode PHP berikut untuk tampilkan posting berhubungan tanpa plugin:
<?php
//for use in the loop, list 5 post titles related to first tag on current post
$tags = wp_get_post_tags($post->ID);
if ($tags) {
echo 'Related Posts';
$first_tag = $tags[0]->term_id;
$args=array(
'tag__in' => array($first_tag),
'post__not_in' => array($post->ID),
'showposts'=>5,
'caller_get_posts'=>1
);
$my_query = new WP_Query($args);
if( $my_query->have_posts() ) {
while ($my_query->have_posts()) : $my_query->the_post(); ?>
<ol><li><a href="<?php the_permalink() ?>" rel="bookmark" title="Permanent Link to <?php the_title_attribute(); ?>"><?php the_title(); ?></a></li></ol>
<?php
endwhile;
wp_reset_query();
}
}
?>

Maka bug hilang dan lagi-lagi kita telah mengurangi penggunaan plugin pada blog Wordpress kita!
Ada 3 buah plugin yang kita kurangi jika menggunakan cara ini yakni:
  • All In One SEO Pack
  • Robots.txt
  • Yet Another Related Post
Semoga bermanfaat dan sampai jumpa diposting berikutnya!

Membuat blog di Facebook

Dalam Facebook memang tidak tersedia fitur resmi untuk membuat blog. Tetapi berkat aplikasi buatan para pengguna Facebook, terdapat beberapa aplikasi blog yang siap anda gunakan dalam pembuatan blog dalam Facebook anda. Jika anda ingin membuat blog di Facebook atau iseng ingin membuat blog ikuti langkah-langkah di bawah ini.
Langkah 1:
Dalam keaadaan anda sudah log in kedalam akun Facebook anda, cobalah untuk memasukan kata kunci / keyword “blog” pada bagian search untuk mencari aplikasi blog yang tersedia.
Langkah 2:
Akan muncul beberapa aplikasi blog yang dibuat oleh pihak ketiga. Kali ini pilihlah yang merupakan buatan Shujaat bin tariq dengan ikon B berwarna biru, dan klik View Aplication.
Langkah 3:
Selanjutnya akan muncul halaman utama aplikasi blog tersebut. Klik Go Aplication.
Langkah 4:
Kemudian anda akan mendapatkan beberapa blog yang telah di publishkan oleh pengguna Facebook lainya dengan aplikasi yang sama juga. Di halaman ini juga terdapat link untuk membuat blog pertama anda. Klik Create New Blog Entry.

Langkah 5:
Sebelum anda dapat membuat blog entry baru, anda harus mengaktifkan blog face. Klik Add Face Blog
Langkah 6:
Di halaman berikutnya anda akan diminta konfirmasi untuk memberikan akses untuk tampilan profile dan segala sesuatu yang berkenaan dengan data diri anda di Facebook. Klik Allow
Langkah 7:
Anda akan menjumpai kembali tampilan halaman yang sama dengans ebelumnya. Klik Create New Blog Entry
Langkah 8:
Ada baiknya anda membuat kategori terlebih dahulu untuk menjadikan blog anda menjadi lebih rapi berdasarkan topik-topik berbeda yang anda buat. Klik Add New Category
Langkah 9:
Pada dialog Add New Category, berikan nama untuk kategori tersebut pada bagian Title. Untuk Description berikan penjelasan singkat menenai kategori tersebut, atau bisa juga anda biarkan dalam keaadaan kosong namun ada baiknya di isi terlebih dahulu.
Langkah 10:
Sejurus kemudian kategori baru yang telah anda buat kini sudah tercantum di dalam blog anda.
Langkah 11:
Anda bisa membuat beberapa kategori lainya dengan cara yang sama. Jika demikian maka nantinya di bagian Categories akan muncul nama-nama kategori yang anda telah buat tadi. Kali ini anda sudah bisa membuat blog entry dengan mengklik Create New Blog Entry.
Langkah 12:
Sebenarnya untuk aplikasi blog buatan shujaat bin tariq ini memiliki fitir WYSIWYG editor, namun saat artikel ini di susun ternyata masih terdapat perbaikan. Karena itu kali ini tampilanya tak ubahnya dengan Basic Editor. Masukan namajudul pada title dan pilih kategori yang ingin anda pakai.
Langkah 13:
Anda bisa memasukan artikel blog anda di bagian yang telah di sediakan. sayangnya kali ini fitue WYSIWYG editor masih belum sempurna. Tetapi anda bisa menyertakan link video dari Youtube disini.
Langkah 14:
Untuk memasukan video dari Youtube, cari video yang anda cari menggunakan fasilitas search di Youtube. Setelah anda menemukan hasil pencarian video, klik salah satu yang anda inginkan, lalu copy alamat URL dari video tersebut dan masukan URL video yang anda dapatkan dari Youtube tadi di bagian Video URL.
Langkah 15:
Setelah semuanya nada yakini telah terisi dengan benar klik Publish. Kemudian anda akan mendapatkan pesan bahwa blog anda telah selesai di buat.

Bagaimana menurut anda? Apakah anda juga akan membuat blog di Facebook seperti saya?

Tips merawat komputer

1. Defrag harddisk secara berkala. Fungsi defrag adalah untuk menata dan mengurutkan file-file harddisk berdasarkan jenis file/data sedemikian rupa sehingga akan mempermudah proses read/write sehingga beban kerja akan lebih ringan yg akhirnya dapat memperpanjang umur harddisk. Caranya klik menu Start > Program > Accesories > System Tool > Disk DefragmenterSaat menjalankan fungsi ini tidak boleh ada program lain yg berjalan termasuk screensaver karena akan mengacaukan fungsi defrag ini.
2. Aktifkan screensaver Selain bersifat estetis, screensaver mempunyai fungsi lain yg penting. Monitor CRT juga televisi menggunakan fosfor untuk menampilkan gambar. Kalau monitor menampilkan gambar yg sama untuk beberapa saat maka ada fosfor yang menyala terus menerus. Hal ini dapat mengakibatkan monitor bermasalah yaitu gambar menjadi redup/kurang jelas. Lain halnya jika monitor Anda adalah LCD, LED yg sudah dilengkapi dengan energy saving, maka screensaver tidak terlalu dibutuhkan lagi.Cara+ mengaktifkan screensaver dapat dilakukan dengan banyak cara, salah satunya klik Start > Control Panel > Display > klik tab screensaver, kemudian pilih sesuai selera Anda.
3. Ventilasi yang cukup Tempatkan monitor maupun CPU sedemikian rupa sehingga ventilasi udara dari dan ke monitor / CPU cukup lancar. Ventilasi yg kurang baik akan menyebabkan panas berlebihan sehingga komponen/rangkaian elektronik di dalamnya akan menjadi cepat panas sehingga dapat memperpendek umur komponen tsb. Oleh karena itu usahakan jarak antara monitor/CPU dengan dinding/tembok minimal 30 cm. Kalau perlu pasang kipas angin di dalam ruangan.
4. Pakailah UPS atau stavolt.Pakailah UPS untuk mengantisipasi listrik mati secara tiba-tiba yg dapat mengakibatkan kerusakan pada harddisk. Kalau terpaksa tidak ada UPS, pakailah Stavolt untuk mengantisipasi naik turunnya tegangan listrik.
5. Tutup / close program yg tidak berguna Setiap program yg diload atau dijalankan membutuhkan memory (RAM) sehingga semakin banyak program yg dijalankan semakin banyak memory yg tersita. Hal ini selain dapat menyebabkan komputer berjalan lambat (lelet) juga beban kerja menjadi lebih berat yg akhirnya dapat memperpendek umur komponen/komputer.
6. Install program antivirus dan update secara berkala Untuk dapat mengenali virus/trojan2 baru sebaiknya update program antivirus secara berkala. Virus yg terlanjur menyebar di komputer dapat membuat Anda menginstall ulang komputer. Hal ini selain membutuhkan biaya juga akan menyebabkan harddisk Anda akan lebih cepat rusak dibanding apabila tidak sering diinstall ulang.
7. Bersihkan Recycle Bin secara rutinSebenarnya file/folder yg kita hapus tidak langsung hilang dari harddisk karena akan ditampung dahulu di Recycle Bin ini dengan maksud agar suatu saat apabila Anda masih membutuhkannya dapat mengembalikan lagi. Recycle Bin yg sudah banyak juga akan menyita ruang harddisk yg dapat menyebabkan pembacaan harddisk jadi lelet.Caranya jalankan Windows Explorer > klik Recycle Bin > klik File > klik Empty Recyle BinAtau Anda dapat menjalankan fungsi Disk Cleanup Caranya Klik Start > Program > Accessories > System Tool > Disk Cleanup > kemudian pilih drive yg mau dibersihkan > setelah itu centangilah opsi Recycle Bin kalau perlu centangi juga yg lain (seperti temporary file, temporary internet file), setelah klik OK.
8. Jangan meletakkan Speacker Active terlalu dekat dengan monitorKarena medan magnet yang ada pada speacker tersebut akan mempengaruhi monitor yaitu warna monitor menjadi tidak rata atau belang-belang.
9. Uninstall atau buang program yg tidak bergunaRuang harddisk yg terlalu banyak tersita akan memperlambat proses read/write harddisk sehingga beban kerjanya akan lebih berat sehingga harddisk akan cepat rusak.
10. Bersihkan motherboard & periferal lain dari debu secara berkalaSetidaknya enam bulan sekali hal ini harus dilakukan. Buka casingnya terlebih dahulu kemudian bersihkan motherboard dan periferal lain (RAM, Video Card, Modem, Sound Card, CDR/CDRW/DVRW, TV Tuner) dengan sikat halus. Pada saat komputer tidak digunakan tutuplah komputer (monitor, CPU, keyboard/mouse) dengan cover sehingga debu tidak mudah masuk ke dalam komputer.
11. Pasang kabel ground. Apabila casing nyetrum, ambil kabel dengan panjang seperlunya, ujung satu dihubungkan dengan badan CPU (pada casing) sedangkan ujung yg lain ditanam dalam tanah. Hal ini akan dapat menetralkan arus listrik yg “nyasar” sehingga dapat membuat komponen elektronik lebih awet.(diambil dari berbagai sumber)

Cara membersihkan virus matrox

Virus MaxTrox (Maximum Troxer) yang dideteksi sebagai W32/Dloader.HFZC, mengubah wallpaper desktop di komputer menjadi gambar MaxTrox. Wallpaper ini akan aktif pada setiap tanggal 1 s/d 6 pada bulan April, Agustus dan Desember. Untuk membersihkan virus MaxTrox, ikuti langkah-langkah berikut ini:
1. Sebaiknya lakukan pembersihan pada mode Safe Mode.
2. Matikan proses virus yang aktif di memori. Gunakan tools pengganti task manager, seperti Itty Bitty Process Manager yang dapat didownload di: http://majorgeeks.com/Itty_Bitty_Process…
Lakukan kill process, pada file virus yang aktif yaitu:
* C:\Documents and Settings\%user%\Application Data\Microsoft\%dsh%.exe (nama virus random/acak, semisal aizw.exe, scnp.exe, dll).
3. Hapus string registry yang telah dibuat oleh virus. Untuk mempermudah dapat menggunakan script registry dibawah ini:
[Version]
Signature=”$Chicago$”
Provider=Vaksincom Oyee
[DefaultInstall]
AddReg=UnhookRegKey
DelReg=del
[UnhookRegKey]
HKLM, SOFTWARE\Classes\batfile\shell\open\comm… %*”
HKLM, SOFTWARE\Classes\comfile\shell\open\comm… %*”
HKLM, SOFTWARE\Classes\exefile\shell\open\comm… %*”
HKLM, SOFTWARE\Classes\piffile\shell\open\comm… %*”
HKLM, SOFTWARE\Classes\regfile\shell\open\comm… “%1″”
HKLM, SOFTWARE\Classes\scrfile\shell\open\comm… %*”
HKLM, SOFTWARE\Microsoft\Windows NT\CurrentVersion\Winlogon, Shell,0, “Explorer.exe”
HKLM, SYSTEM\ControlSet001\Control\SafeBoot, AlternateShell,0, “cmd.exe”
HKLM, SYSTEM\ControlSet002\Control\SafeBoot, AlternateShell,0, “cmd.exe”
HKLM, SYSTEM\ControlSet003\Control\SafeBoot, AlternateShell,0, “cmd.exe”
HKLM, SYSTEM\CurrentControlSet\Control\SafeBoo… AlternateShell,0, “cmd.exe”
HKCU, Software\Microsoft\Windows\CurrentVersio… ShowSuperHidden, 0×00010001,1
HKLM, SOFTWARE\Microsoft\Windows\CurrentVersio… CheckedValue, 0×00010001,0
HKLM, SOFTWARE\Microsoft\Windows\CurrentVersio… DefaultValue, 0×00010001,0
[del]
HKCR, exefile, NeverShowExt
HKLM, SOFTWARE\Classes\exefile, NeverShowExt
HKLM, SOFTWARE\Microsoft\Windows\CurrentVersio… VisualStyle
HKCU, Control Panel\Desktop, SCRNSAVE.EXE
* Gunakan notepad, kemudian simpan dengan nama “repair.inf” (gunakan pilihan Save As Type menjadi All Files agar tidak terjadi kesalahan).
* Jalankan repair.inf dengan klik kanan, kemudian pilih install.
* Sebaiknya membuat file repair.inf di komputer yang clean, agar virus tidak aktif kembali.
4. Hapus file induk virus yang mempunyai ciri-ciri sebagai berikut :
* Icon “WinRAR”
* Ekstensi *.exe, *.scr, *.msd, *.sysm
* Ukuran 77 KB
Catatan:
* Sebaiknya tampilkan file yang tersembunyi agar mempermudah dalam proses pencarian file virus.
* Untuk mempermudah proses pencarian sebaiknya gunakan “Search Windows” dengan filter file *.exe, *.scr, *.msd, *.sysm yang mempunyai ukuran 77 KB.
* Hapus file virus yang biasanya mempunyai date modified yang sama.
5. Hapus file duplikasi virus pada folder C:\Program Files (biasanya file virus diikuti file executable asli yang telah di-rename menjadi EXE File oleh virus).
6. Ubah kembali ekstensi file executable yang telah di-rename oleh virus pada folder C:\Program Files. Gunakan software/tool untuk mempermudah rename ekstensi secara cepat, misalnya Extention Renamer.
7. Untuk pembersihan yang optimal dan mencegah infeksi ulang, sebaiknya gunakan antivirus yang ter-update dan dapat mengenali virus tersebut untuk mempermudah penghapusan virus.
Anda Bisa menggunakan Antivirus Avira,Sebagai Pelengkap Anda Bisa Tambahkan vira Removal Tool Bisa Anda Download Di sini
bisa juga menggunakan PCMAV Ragnarox 30

selamat mencoba

Membuat animasi gerak revolusi

Perhatikan animasi gerak revolusi di bawah ini!


Untuk membuat animasi gerak revolusi tersebut ikuti langkah berikut!

Buka program Swift 3D
Aturlah layout (unit : centimeter)
Aturlah bagian Environtment (background color : sesuai keinginan anda)
Menggambar Bola Pertama (Matahari)

Clik icon Create Sphere
Atur properties Sphere

Radius : 0.1

Atur properies Position

x : 0
y : 0
z : 0

Menggambar Bola Kedua (Bumi)

Klik icon Create Sphere
Atur properties Sphere

Radius : 0.05

Atur properies Position

x : 0.6
y : 0
z : 0

klik tombol Animate

Klik bola kedua (bumi)
Klik frame 10
Atur properies Position bola kedua

x : 0.52
y : - 0.3
z : 0

Klik frame 20
Atur properies Position

x : 0.3
y : - 0.52
z : 0

Klik frame 30
Atur properies Position

x : 0
y : - 0.6
z : 0

Klik frame 40
Atur properies Position

x : -0.3
y : - 0.52
z : 0

Klik frame 50
Atur properies Position

x : -0.52
y : - 0.3
z : 0

Klik frame 60
Atur properies Position

x : -0.6
y : 0
z : 0

Klik frame 70
Atur properies Position

x : -0.52
y : 0.3
z : 0

Klik frame 80
Atur properies Position

x : -0.3
y : 0.52
z : 0

Klik frame 90
Atur properies Position

x : 0
y : 0.6
z : 0

Klik frame 100
Atur properies Position

x : 0.3
y : 0.52
z : 0

Klik frame 110
Atur properies Position

x : 0.52
y : 0.3
z : 0

Klik frame 120
Atur properies Position

x : 0.6
y : 0
z : 0

klik icon Animating

Klik icon Play Animation

Tips dan Trik Cara Menggunakan Proxy lewat Mozilla Firefox atau Yahoo Messenger

Tanpa mengabaikan fakta bahwa sudah banyak sekali tutorial mengenai proxy yang telah ditulis, namun tidak ada salahnya jika saya kali ini ingin memberikan cara-cara menggunakan proxy, dengan menggunakan bahasa atau cara saya sendiri. Untuk penjelasan teoritis mengenai proxy anda dapat melihat artikel saya yang dulu di sini.
Oke, kembali ke pembahasan atau pemelajaran proxy. Untuk Mozilla Firefox anda dapat mengedit atau memberikan alamat proxy lewat langkah berikut:


Firefox >> Tools >> Options >> Advance >> Network >> Configure how Firefox connects to the Internet >> Setting >> Manual proxy configuration
Atau kalau sudah menginstal addon SwitchProxy Tool yang bisa didownload / instal di Sini anda tinggal mengeklik tombol toolbar “add” pada toolsbar switchproxynya. Nah dari situ tinggal masukkan alamat proxynya sekaligus portnya. Untuk contoh proxy, saya berikan listnya dibawah ini untuk, yang saya ambil dari http://proxy-list.org/en/index.php :
12.206.64.181:32588
66.176.139.15:50121
200.88.223.99:80
222.122.21.119:80
76.17.4.168:48456
219.185.110.148:8080
203.69.39.250:80
125.246.96.194:3128
64.246.26.165:80
219.105.111.147:8080
222.122.21.122:80
62.75.162.87:3128
122.203.17.130:3128
124.138.138.66:3128
124.138.130.130:3128
140.127.139.248:3128
213.75.36.121:80
163.27.120.249:3128
60.62.108.191:80
80.58.205.61:80
91.121.67.145:8080
122.153.74.130:3128
203.186.125.23:45494
59.45.116.13:32000
195.242.192.18:8080
203.198.78.43:3128
124.138.206.2:3128
203.69.39.251:80
bisa juga ambil proxy terbaru disini. Pilih salah satu ip proxy diatas (bisa juga load semuanya lewat notepade, seperti mengelad id boot, ataupun password list atau username list untuk yahoo messenger, untuk yang sudah menginstal addon switchproxy di firefoxnya). Jika proxy yang saya berikan diatas sudah gak bekerja ganti dengan proxy yang lain atau googling aja. Nah disebelah tanda titik dua itu merupakan alamat portnya dan di depannya merupakan alamat proxy. Semisal dalam contoh proxy diatas 219.185.110.148:8080, nah 219.185.110.148 merupakan alamat proxynya sedang 8080 merupakan alamat portnya. Proxy dalam contoh diatas merupakan IP proxy yang berasal dari bermacam negara semisal Australia, Korea Selatan dan sebagainya. Ketika anda menggunakan proxy maka IP yang terdeteksi akan merupakan IP yang berasal dari negara tersebut. Dengan demikian anda dapat menggunakan proxy sebagai sebuah topeng terselubung untuk koneksi anda. Jika anda mendapati situs yang menolak anda masuk atau mengaksesnya dikarenakan anda berasal dari Indonesia (dibaca lewat IP) anda bisa menggunakan proxy untuk mengelabuhi situs tersebut. Anda juga bisa menggunakan proxy ini untuk mengelabuhi rapidshare ketika mendownload sesuatu dari sana. Ohya untuk tingkat lanjut anda juga bisa menggunakan sock proxy maupun password proxy untuk keperluan seperti ini (terutama untuk proxy yang berbayar atau pribadi). Sekedar info, para hacker juga sangat membutuhkan proxy untuk menutupi dirinya dalam melakukan kegiatan hack supaya tidak diketahui oleh korban atau orang lain.
download proxy checker disini >>
Kadang kala kita tidak mengetahui apakah yang masuk daftar list proxy tersebut bekerja atau tidak nah, disini anda bisa menggunakan software proxy checker untuk mengetahui apakah proxy tersebut bagus atau tidak. Terkadang software cracking juga sudah menyediakan fasilitas proxy checker seperti ini di dalamnya sehingga tanpa harus menggunakan software tersendiri ia sudah dapat mengetahui proxy mana yang bagus atau tidak. Anda juga bisa mengecek proxy secara online lewat situs-situs tertentu (googling aja dengan keyword proxy checkker) akan tetapi ini malah tidak bagus dan memakan waktu yang lama, serta biasanya harus kopi paste proxynya satu persatu. Saya sarankan gunakan proxy checker saja untuk keperluan cek dan ricke proxy seperti ini. Kelebihan software proxy checker adalah ia bisa mengecek secara terus-menerus proxy kita serta memiliki kecepatan ngeceknya yang (kalau dibandingkan dengan melalui situs proxy checker) tinggi. Saya jamin deh. :D
Ohya, jenis proxy tuh ada beberapa macam, semisal proxy seperti contoh saya diatas, http proxy, ftp proxy, gopher proxy, wais proxy dan lain lain. Ditampilan proxy firefox sudah keliatan kok jenis-jenisnya. Kalau saya salah mohon dikoreksi
Anda juga bisa menggunakan proxy secara mudah dengan menambahkan atau menkopi pastekan url pada situs tertentu. Namun kadangkala hal ini tidak lalu mengubah IP anda, saya beberapa kali coba ip asli saya masih kedeteksi. Saya mencoba cara ini untuk rapidshare download tidak bisa, karena tidak suport ssl encriptionnya. Selain juga koneksinya seringkali malah jadi lambat. Untuk list url http proxy seperti ini, saya ambilkan dari salah satu artikel teman saya o-om.blogspot.com :
http://publicwebproxy.info/index.php?q=[link target]
http://anonymouse.org/cgi-bin/anon-www.cgi/[link target]
http://www.invisiblesurfing.com/surf.php?q=[link target]
http://www.proxyhero.com/index.php?start_using_cgi_proxy=[link target]
http://securebar.secure-tunnel.com/cgi-bin/nph-freebar.cgi/[link target]
http://proxiesrus.com/cgiproxy/nph-proxy.pl/[link target]
http://www.proxygate.de/nph-proxy.cgi/[link target]
http://www.free-web-proxy.info/nph-proxy.pl/[link target]
http://www.roboproxy.com/cgi-bin/nph-robo.cgi/[link target]
http://getaroundfilters.com/nph-proxy.pl/|000100A/http/[link target]
http://proxy.pureprivacy.com/cgi-bin/nph-pureprivacy.plx/[link target]
http://w1.hidemyass.com/index.php?hl=1011000001&q=[link target]
http://www.proxsafe.net/proxy.php?p=79&q=[link target]
http://www.seekproxy.com/index.php?hl[link target]
http://okproxy.net/index.php?hl=0011000001&q=[link target]
http://www.provacy.com/phproxy/index.php?hl=0011000001&q=[link target]
http://www.workbrowse.com/index.php?hl=0011000001&q=[link target]
http://proxybat.com/index.php?hl=0011000001&q=[link target]
http://www.proxydoll.com/index.php?hl=0011000001&q=[link target]
http://www.modernproxy.com/index.php?hl=0011000001&q=[link target]
http://proxy-site.info/index.php?hl=0011000001&q=[link target]
http://www.nevercaught.com/index.php?hl=0011000001&q=[link target]
http://proxycover.net/index.php?hl=0011000001&q=[link target]
http://www.goproxing.com/index.php?hl=0011000001&q=[link target]
http://www.gopast.net/index.php?hl=0011000001&q=[link target]
http://proxybar.info/index.php?hl=0011000001&q=[link target]
http://www.proxyol.com/url/?hl=0011000001&q=[link target]
http://proxy.tl/index.php?hl=0011000001&q=[link target]
http://pipeproxy.com/index.php?hl=0011000001&q=[link target]
http://etproxy.com/proxy.php?hl=0011000001&q=[link target]
http://proxyvibe.com/index.php?hl=0011000001&q=[link target]
http://anonymouse.org/anonwww.html
http://www.ninjaproxy.com/
http://www.youhide.com/
Caranya masuk saya ke situs tersebut, kemudian terdapat kolom url ke situs link target atau tujuan, kopipastekan disana, nah selesai deh. Atau anda juga bisa menkopipastekan langsung dengan menambahkan url tujuan atau target dibelakang url http proxy tersebut.
Sedangkan untuk yahoo messenger anda bisa menambahkan proxy lewat menu preferences.
Messenger >> Preferences >> Conection >> Use Proxy
Untuk yahoo proxy listnya bisa di lihat di:
Yahoo Proxy List
Dan lakukan hal yang sama dengan yang saya anjurkan diatas. Chat client seperti Yahelite pun menyediakan fasilitas penggunaan proxy untuk koneksitas chatting ke dunia Yahoo Messenger. Keunggulan dan kelemahan proxy pernah saya bahas di artikel saya yang lampau.
Satu hal lagi yang perlu diingat. Untuk bisa menggunakan proxy di Yahoo Messenger, anda harus mengubah proxy yang ada di Internet Explorer karena Yahoo Messenger menggunakan proxy atau ip yang sama mengikuti Internet Explorer bawaan Windows anda. Untuk lebih cepat tanpa repot repot mengubah proxy di YM ataupun IE, anda bisa menggunakan script bat. Caranya silahkan lihat di sini.
Sekedar Info
Semoga Bermanfaat

Hubungi "semua tutorial"

Sunday, August 29, 2010


Your Name :
Your Email :
Subject :
Message :
Image (case-sensitive):

Merubah Gambar berwarna menjadi Hitam putih yang Artistik

Anda suka dengan Foto/ gambar berwarna hitam putih? Ada banyak orang yang menykai gambar hitam putih karena terkesan klasik dan artistik. eh tahu nggak sebenarnya berwarna hitam putih sebenarnya tidak semudah yang kita kita lho! membutuhkan beberapa langkah dan trik dalam membuatnya lebih menarik dan lebih indah dipandang! Ternyata perlu sentuhan artistik untuk mewujudkannya, tentunya dengan bantuan dari adobe Photoshop kita. nah disini yang diperlukan adalah penguasaan untuk mengatur tata warna dan pencahayaan adalah kuncinya.
  • Langkah pertama:
Silahkan klik menu File => open untuk membuka Foto berwarna yang ingin anda sulap menjadi htam putih yang artistik.
  • Langkah kedua:
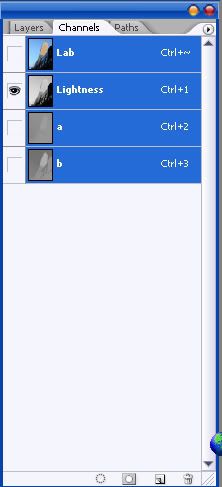
Sekarang anda perhatikan pada jendela Channels. Jika jendela Channel belum terbuka atau terlihat oleh anda, anda dapat membukanya dengan cara memilih menu Windows => Channels.
Pada Pallete Channel Tersebut anda dapat melihat bahwa Photoshop sebenarnya memisahkan masing masing Channel red, Green, dan Blue. Nah inilah yang biasanya dikenal dengan sebutan RGB. Foto Ternyata Foto yang sebenarnya kita lihat merupakan gabungan dari ketiga Channel tersebut.
  • Langkah ketiga:
Pada langkah ini kita akan mencoba mengenal Mode lainnya pada photoshop…yakni Mode Lab. Untuk itu silahkan anda pilih menu Image => Mode => Lab Color. Nah Lab Color ini membagi bagi warna gambar menjadi Channel “Lightness” atau pencahayaan, Channel “a” yang mewakili perpaduan warna antara magenta dan hijau, dan Channel “b” yang mewakili warna antara kuning dan biru.
Nah sekarang tugas anda adalah hilangkan icon mata icon eye pada panel adobe photoshop pada Channel “a” dab “b” lalu klik Channel lightness. Dan kini sudah jelas terlihat warna warna pada foto/ gambar anda telah menglilang.
hilangkan icon mata pada channel
  • Langkah 4:
Pada langkah sebelumnya anda telah melakukan konversi dari mode RGB ke mode Lab Color. Pada langkah ini, kita akan lakukan pengulangan langkah tersebut sekali lagi konversi, yaitu dari mode Lab Color ke Mode Grayscale. Caranya silahkan anda pilih menu Image => Mode => Grayscale. Nah coba perhatikan sekarang pada jendela Channels anda hanya melihat satu Channel saja yakni “Gray“.
  • Langkah 5:
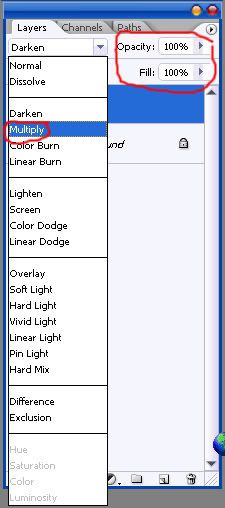
Sekarang Foto/ gambar anda telah berwarna hitam putih, selanjunya anda dapat mengatur lebih lanjut dengan memberikan efek Blend Mode, seperti Multiply atau Screen. Silahkan anda duplikasikan terlebih dahulu foto anda dengan dengan menekan shortcut keyword CTRL+J sehingga tercipta layer baru bernama Layer 1.
Default Blend Mode pada layer 1 adalah Normal, anda dapat merubahnya dengan memilih Multiply ( Jika ingin menciptakan efek yang lebih gelap), atau memilih Screen (Jika ingin menciptakan efek yang lebih terang). Sebagai contoh saya memilih opsi Multiply.
  • Langkah 6:
sebagai finishing, Jika anda merasa foto/ gambar terlalu gelap atau terlalu terang dari yang diharapkan, anda dapat menggeser Opacity dari mulai 0% sampai dengan 100%. Sebagai contoh saya memilih Opacity sebesar 30%. Namun tentunya anda dapat menyesuaikannya sesuai kebutuhan foto/ gambar atau menurut selera pribadi anda.
ubah blend mode dan atur opacity sesuai kebutuhan-adobe photoshop liezmaya.web.id
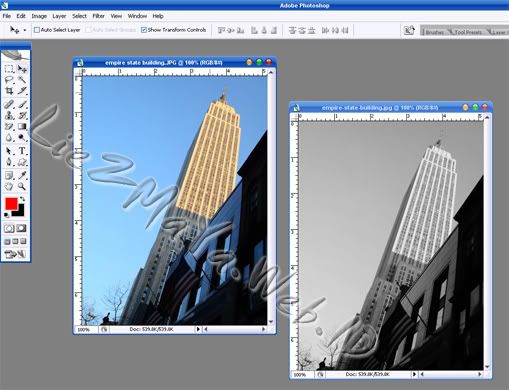
Silahkan anda bandingkan hasil akhirnya, walupun foto/ gambar yang tadinya berwarna hitam telah disulap menjadi hitam putih, akan tetapi hasil foto hitam putih yang dihasilkan memiliki seni tersendiri yang tentu saja berbeda jika anda langsung mengubah sebuah foto berwarna menjadi mode grayscale saja.
Nah ternyata tidak selamanya nuansa hitam putih itu selalu terlihat kuno bukan?
editing image with adobe photoshop
monggo dipraktekin langsung kalo berminat, Semoga bermanfaat ya :)

Mengubah Foto Biasa menjadi sketsa

~ Langkah Pertama.
Seperti biasa, monggo dibuka File gambar yang pengen kita bikin jadi gambar sketsa, caranya klik File -> New yang terdapat pada menu atas, atau bisa menekan shortcut “Ctrl+N” pada Win system atau”Command+N” pada a Mac.
Sebagai contoh kali ini saya menggunakan gambar aktor favorite saya Daniel radcliffe alias harry potter hehe, yah soalnya minta foto kekasih sendiri gak boleh sih *weks gubrag, gak nyambung banget!
~ Langkah 2.
Langkah kedua ini kita akan merubah gambar/ image dengan Tool desaturate.
Klik menu Image -> Adjustments -> Desaturate, atau gunakan kombinasi shortcut keyboard ( Shift+CTRL+U).
~ Langkah 3.
Dalam langkah ini kita akan menduplikat layer Utama/ background.
caranya silahkan anda klik kanan pada layer Background -> Duplicate layer -> setelah muncul kotak dialog, langsung saja OK, nanti secara otomatis akan tercipta satu layer baru bernama Background copy.
~ Langkah 4.
Klik (aktifkan) layer background Copy, pilih menu image -> Adjustment -> invert. atau gunakan keyboard shortcut CTRL+I, hingga nantinya akan nampak seperti negatif film.
~ Langkah 5.
Kita akan melanjutkan ke step 5 dengan layer background copy.
Silahkan anda ubah Mode layer pada jendela Layer Tool, ubah dari mode normal menjadi Color Dodge, hingga nantinya gambar kita akan berubah menjadi nampak putih *berseri.
~ Langkah 6.
Langkah terkahir dan yang paling ditunggu tunggu hasilnya oleh sodara sodara adalah step dimana kita akan memunculkan efek sketsa gambar/ image kita menggunakan Tool efek Blur.
caranya: silahkan pilih menu Filter -> Blur -> Gaussian Blur.
Silahkan anda atur radiusnya sesuai dengan keinginan nada dengan cara menggeser/ drag parameter blur window.
Untuk melihat hasilnya secara langsung jangan lupa anda men-checklist opsi Preview untuk dapat melihat perubahan efeck blur secara langsung pada layer, lalu OK.
tutorial tips photoshop liezmaya: mengubah foto biasa menjadi sketsa

Klik image untuk melihat Ukuran sebenarnya/ lebih besar.
Nah selesai deh, gampang kan!
Silahkan dicoba, berkesperimen dengan kreasi dan imajinasi anda sendiri hehe. Good Luck! ;)
Ditulis oleh: LieZMaya

Membuat Tulisan/ Text efek berbayang atau bergaya Cermin

tips adobe photoshop liezmaya

Langkah 1: Membuat dokumen baru photoshop

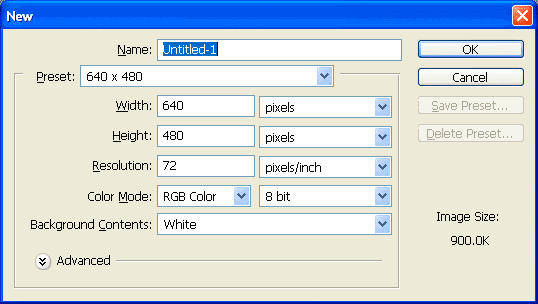
Buat dokumen baru potoshop dengan cara mengklik File -> New yang terdapat pada menu atas, atau bisa menekan shortcut “Ctrl+N” pada Win system atau”Command+N” pada a Mac. buat ukuran baru dokumen seperti contoh gambar dibawah yaitu sebesar “640 x 480″ atau sesuai dengan kebutuhan anda, lau Klik OK.
Creating a new document in Photoshop

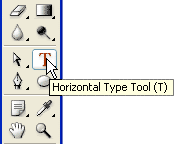
Langkah 2: pilih Type Tool pada Tools Palette

Untuk langkah kedua silahkan anda klik perangkat Type Tool yang terdapat pada tool pallete yang bergambar icon Huruf T seperti pada contoh gambar dibawah.
Select the Type tool from the Tools palette

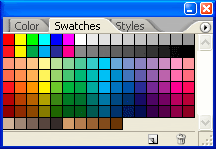
Langkah 3: Memilih Warna & Jenis Huruf

Silahkan anda pilih jenis warna dan jenis huruf yang anda inginkan.
Photoshop's Swatches palette

Langkah 4: Ketikan rangkaian Kata yang Diinginkan

Silahkan anda ketikan kata/ rangkaian kata kata yang anda inginkan pada gambar.
Type a word into the document with the Type tool

Langkah 5: Duplicate/ copy Type Layer Pada Layers Palette

Langkah selanjutnya adalah mengkopi (megcopy) type layer yang terdapat pada layer pallet yang biasanya terdapat pada sebelah kanan bawah dengan cara klik kanan -> duplicate Layer, atau silahkan anda gunakan sortcut keybord “Ctrl+J” (Win) atau “Command+J” (Mac), sehingga terciptalah duplikat/ copian dari layer tulisan.

Langkah 6: Flip Text layer menjadi arah Vertically

Langkah selanjutnya adalah membalikan/ transform layer asli menjadi berbalik arah atau menjadi arah vertikal, dengan cara mengklik Edit (pada menu atas) -> Transform -> Vertically. Select the original text layer in the Layers palette, then select Transform - Flip Vertical from Photoshop's Edit Menu

Langkah 7: Geser layer Vertikal

Selanjutnya silahkan anda geser kebawah layer Vertikal yang tadi telah kita transform pada langkah 6 sesuai dengan selera anda, seperti pada contoh dibawah ini.
Nudging the text down

Langkah 8: tambahkan/ bubuhi Layer Mask kedalam Layer Vertikal

langkah selanjutnya adalah menambahkan Layer mask dengan cara mengklik Icon Add Layer mask yang terdapat pada Layer pallete (samping icon Blending option).

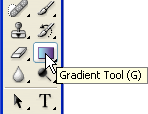
Langkah 9: Pilih Gradient Tool pada The Tools Palette

Pilih Tool gradient ang terdapat pada tool Pallete seperti contoh gambar dibawah atau menekan shortcut keyboard “G”.
Photoshop's Gradient tool
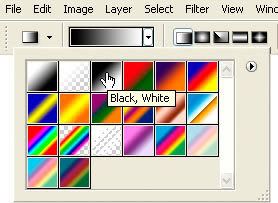
untuk selanjutnya silahkan anda pilih menu Gadient Tool tersebut dengan memilih jenis warna gradient yang diinginkaan, silahkan anda pilih gradient hitam putih “black, white” seperti contoh gambar bawah.
Selecting the black-to-white gradient

Sebelum beranjak ke langkah 10 pastikan terlebih dahulu layer yang sedang aktif adalah layer copian/ copyan yaitu layer Vertikal yang telah dibubuhi Layermask pada langkah no. 6.

Langkah 10: Drag Gradient Tool Pada layer Mask Vertical

Sekarang telah sampailah kita pada langkah terakhir/ final yaitu mendrag Tool gradient pada layer Mask sebai pelengkap/ komplit efek gambar kita. berfungsi supaya lebih terlihat elegant dan berbayang/ bergaya cermin seperti contoh gambar dibawah silahkan anda lakukan drag Tool gradient secara lurus berdiri (Vertikal) atau sesuai dengan selera anda mengenai drajat pen-drag-annya hehe.
Dragging out a gradient with the Gradient tool
dan inilah hasil akhirnya “keren kan!“…oh Finally, Silahkan dicoba sendiri ya, mudahan berhasil “Goodluck” Maaf apabila ada yang kurang dimengerti silahkan tanyakan langsung sajah sama saya, maaf apabila dalam pengempaian tutorialnya agak memusingkan, maklum masih belum pandai merangkai kata heuheuThe final result

Kumpulan kode-kode berbagai tipe handphone

Di bawah ini adalah kumpulan kode-kode rahasia Handphone yang pernah saya rangkum dulu, lupa sumbernya darimana, maklum cuma copy paste aja, siapa tahu kode-kode tersebut anda perlukan, makanya saya posting aja, itung-itung nambah artikel blog saya, Oh ya sekedar sharing aja kode handphone yang sering saya pakai hanyalah kode untuk mengetahui Jenis Type (tipe) HP Nokia yaitu *#0000# (baca: bintang pagar nol nol nol nol pagar). dan dibawah ini adalah kode kode rahasia handphone selengkap-lengkapnya, namun belum pernah aku coba semua, silahkan anda mencobanya sendiri!:-)
NOKIA
*#06# :for IMEI
*#92702689# :All Manufacture (Warranty)
*#3370# :Enable EFR (To disable, Type it again. Phone Automatically Restart)
*#0000# :View Software version
*#7780# :Restore factory settings
*#67705646# :Clear LCD Display (Operator Logo)
*#2820# :Bluetooth device address
*#746025625# :SIM lock allowed statue
*#62209526# : Display the MAC address
#pw+1234567890+1# :Show if SIM restrictors.
*#4720# :half rate Codec activation (To disable, Type it again)
*#7370925538# :S-60 (Reset)
Default code is 12345
*#3925538# : Delete the contents and code of wallet
*#7328748263373738# :Reset Phone Code. Default code is 12345
Below are some reset codes for various Series 40, 60 and the new Series 80 Communicator series (Nokia 9300/9500):
Full Reset: (clears everything off the phone memory!! Be sure to back up your contacts!!): *#7370#, 12345 and then Yes.
Soft Reset: *#7780#, 12345 and then Yes. (Also works on Nokia S40 phones as a full reset)
*#335738#
*#delset#
This deletes the Email, GPRS, MMS settings that cannot be erased via phone options. (Newer Series 40 phones only i.e. 6230(b))
SAMSUNG
*#1234# :SW Version
*#2222# :HW Version
*#0842# :Vibrator Test
*#0289# :Buzzer Test
*#0228# :Battery Statue
*#0782# :RTC Display
*#0523# :LCD Contrast
*#0377# :NVM error Log
*#5646# :Logo set
*#0778# :SIM Service Table
*#0638# :SIM Network ID
*#0746# :SIM Info
*#076# : Production no
*#2576# :SIM errors
Lock Manager
*2767*2878# :EPROM Reset
*2767*3855# :Master Reset
*#2767*63342# :Media Reset
*2767*667# :MMS reset
*2767*927# :WAP Reset
If you’re Phone will not reset by using those code:
*2767*637#
*2767*688#
#*7337#
*#9998*3323#
*#9998*627837793#
*2767*7822573738#
unlock Code
Model: Samsung SGH-E715
Turn off the phone. Put a non-accepted SIM Card and turn it on. Type *#9998*3323#. Press Exit. Choose menu #7. After phone reboots type *0141# and hit the Call button. Turn off and insert another SIM Card. Turn on. The code is 00000000.
Model: Samsung SGH-M100
Type *#9998*627837793#. Then type *#9998*737#. Press >/ [] (Play Stop) until phone shows NCK/SPCK number. Press Exit. Type #0111*CODE# (Code is the last 8 digits of the NCK/SPCK)
Model: Samsung SGH-S105
Remove SIM Card. Enter *2767*7822573738# and after phone reboots, enter #0111*00000000#
Model: Samsung SGH-S307
Turn off the phone. Put a non-accepted SIM Card and turn it on. Type *#9998*3323#. Press Exit. Choose menu #7. After phone reboots type *0141# and hit the Call button. Turn off and insert another SIM Card. Turn on. The code is 00000000.
Model: Samsung SGH-X100
Turn off the phone. Put a non-accepted SIM Card and turn it on. Type *#9998*3323#. Press Exit. Choose menu #7. After phone reboots type *0141# and hit the Call button. Turn off and insert another SIM Card. Turn on. The code is 00000000.
Model: Samsung Universal
TEMPORARY UNLOCK:
Put a non-accepted SIM Card and turn it on. Type *#9998*3323#. Press Exit. You will get a new menu. Select Malloc Fail.
In newer phones:
#*7337#
LG
2945*#01*# :Secret menu for LG
*#06# :IMEI (ALL)
*#07# :IMEI and SW (LG 510)
*8375# :Software version (LG B1200)
*6861# :Recount cheksum (LG B1200)
1945#*5101# :Simlock menu (LG B1200)
2945#*5101# :Simlock menu (LG 510W, 5200)
2945#*70001# :Simlock menu (LG 7020, 7010)
2947#* :Simlock menu (LG 500, 600)
LG-U81XX SPECIAL CODES
Code to read phone version :
- Phone without SIM
- Enter 277634#*# or 47328545454#
- Select ‘SW Ver.info’
Code to reset phone :
- Phone without SIM
- Enter 277634#*# or 47328545454#
- Select ‘Factory Reset’
Code to enter UNLOCK MENU :
- Phone wit SIM inside
- Enter 2945#*88110#
Test Menu 8330 : 637664#*#
Test Menu 8180 V10a : 49857465454#
Test Menu 8180 V11a : 492662464663#
Test Menu 8130-8138 : 47328545454#
Test Menu 8110-8120 : 277634#*#
__________________________________________________ _
Alcatel
IMEI number: * # 0 6 #
Software version: * # 0 6 #
Net Monitor: 0 0 0 0 0 0 *
Bosch
IMEI Number: * # 0 6 #
Dafault Language: * # 0 0 0 0 #
Net Monitor: * # 3 2 6 2 2 5 5 * 8 3 7 8 #
Dancall
IMEI number: * # 0 6 #
Software version: * # 9 9 9 9 #
SIMcard serial number: * # 9 9 9 4 #
Information about battery status: * # 9 9 9 0 #
Selftest (only Dancall HP2731): * # 9 9 9 7 #
Show version configuration: * # 9 9 9 8 #
Net Monitor: * # 9 9 9 3 #
Ericsson 6xx/7xx/8xx
IMEI number: * # 0 6 #
Software version: > * < < * < *
Default language: < 0 0 0 0 >
Enter to phone menu without SimCard – after Wrong PIN press NO: * *
0 4 * 0 0 0 0 * 0 0 0 0 * 0 0 0 0 #
Information about SIMLOCK: < * * <
Ericsson A1018S/T10S/T18S/T28S
IMEI number: * # 0 6 #
Software version: > * < < * < *
Default language: < 0 0 0 0 >
Enter to phone menu without SimCard – after Wrong PIN
press NO: * * 0 4 * 0 0 0 0 * 0 0 0 0 * 0 0 0 0 #
Information about SIMLOCK: < * * <
Hagenuk (Duet)
IMEI number: * # 0 6 #
Software version check: # # 9 1 4 0 * 8 3 # 7 5 * 2 #
Motorola
IMEI number: * # 0 6 #
Net Monitor ON: * * * 1 1 3 * 1 * [OK]
Net Monitor OFF: * * * 1 1 3 * 1 * [OK] * – press this until box
shown up
Maxon
*#9988# Tetris Play
*#9900# Software Version
*#9911# L1 Debug on/off
*#9916# Text (scroll trough with up/down)
*#9937# Discharging battery
*#9958# Watch stop
*#9959# Watch start
*#9960# Contrast set
Lock status *#9917#
NOKIA 5110/5120/5130/5190/6110/6120/6130/6150/6190
IMEI number: * # 0 6 #
Software version: * # 0 0 0 0 #
Simlock info: * # 9 2 7 0 2 6 8 9 #
Enhanced Full Rate: * 3 3 7 0 # [ # 3 3 7 0 # off]
Half Rate: * 4 7 2 0 #
Provider lock status: # p w + 1 2 3 4 5 6 7 8 9 0 + 1
Network lock status # p w + 1 2 3 4 5 6 7 8 9 0 + 2
Provider lock status: # p w + 1 2 3 4 5 6 7 8 9 0 + 3
SimCard lock status: # p w + 1 2 3 4 5 6 7 8 9 0 + 4
1234567890 – MasterCode which is generated from IMEI
Nokia 3110
IMEI number: * # 0 6 #
Software version: * # 0 0 0 0 # or * # 9 9 9 9 # or * # 3 1 1 0 #
Simlock info: * # 9 2 7 0 2 6 8 9 #
Philips
IMEI number: * # 0 6 #
Simlock info: * # 8 3 7 7 #
Security code: * # 1 2 3 4 # (Fizz) or * # 7 4 8 9 #
Samsung SGH600/2100DB
IMEI number: * # 0 6 #
Software version: * # 9 9 9 9 # albo * # 0 8 3 7 #
Net Monitor: * # 0 3 2 4 #
Chaning LCD contrast: * # 0 5 2 3 #
Memory info: * # 0 3 7 7 # albo * # 0 2 4 6 #
Reset memory (SIMLOCK`a removing!!!): * 2 7 6 7 * 3 8 5 5#
Reset CUSTOM memory: * 2 7 6 7 * 2 8 7 8 #
Battery state: * # 9 9 9 8 * 2 2 8 #
Alarm beeper: * # 9 9 9 8 * 2 8 9 #
Vibra test: * # 9 9 9 8 * 8 4 2 #
Sagem
IMEI number: * # 0 6 #
Service Menu access: MENU 5 1 1 #
Siemens C25/S25
IMEI number: * # 0 6 #
Software version: put off sim card and enter: : * # 0 6 # and press
LONG KEY
Bunus screen: in phone booke: + 1 2 0 2 2 2 4 3 1 2 1
Net Monitor (S4 Power): Menu 9 8, left SoftKey, 7 6 8 4 6 6 6, Red
phone, Menu 5 6
Sony
IMEI number: * # 0 6 #
Software version: * # 8 3 7 7 4 6 6 #
Show list of product creator names (you must save this number in
your Phone Book with “own phone no.” record): + 1 2 0 2 2 2 4 3 1 21
Samsung sph-n240, n400, a460, a500,
Nam Set: ##Spc
Test Mode: 47*869#1235
Debug Menu: ##33284,ok
Service Menu: Menu+8+0 (#889)
Reset (Life time, Clear Memory, etc): ##786,ok
A-key: ##2539,ok
Label Selection: ##3882,ok
Label(Home, Work, etc) : **523,ok
NGG Setting (Gateway, etc.): ##2769737,ok
Vocoder: ##8626337,ok
CAI Change: ##7738,ok
Enable TTY: ##889,ok
Samsung sch-411, 611, n105, a100, a300, a2000,
Nam Set: 47*869#08#9
Nam Set: Menu+60
Test Mode: *759#813580
Test Mode: 5809540*45680
A-key: Menu+0, 25##
External Audio: Menu+0, ####
Debug Menu: Menu+8, 0415 or Spc
Debug Menu: Menu+9, 0415 or Spc
Brief NAM Programing: Menu+40,626 (not all version)
LCD Contrast: Menu+45 (not all version)
SIO Mode: Menu+49
SIO Mode: Menu+69
Samsung a300, a530, a610, a620, a660, a670,
Nam Set: Menu, 6, *
Service Menu: Menu, 9, *
Test Mode: 47*68#13580
Samsung X, E, V, S-series (korean), e250, v420, s250, etc Nam
Programming:
Nam Set: 6548#0**4#6
Nam Set: 47*869#08#9
Nam Set: 74153697193
Test Mode: 5809540*45680 (88 – efs clear)
Debug Menu: Menu(hold 2sec)+0, 6725 or 9720 or 1973 or 0415
Debug Menu: Menu+0(hold 2sec), 6725 or 9720 or 1973 or 0415
Samsung N356 (India version)
Test Mode: Menu, 5, down arrow, *
Test Mode: **00## (in some flashes)
Samsung i700, etc Nam Programming:
Nam Set: Go to start and select “PHONE” from the drop down menu,
dial #83587
Samsung i300,
1. Tap on the Phone Icon with stylus
2. Press #907*9#0 ENTER LOCK should appear on screen
3. Enter OTKSL
4. SVC MENU will appear press 1
5. Enter 10 digit MIN and then press SAVE
6. Press SAVE again
7. Press 3 and then press SAVE 6 times
8. Enter the HOME SID and press SAVE once
9. Press END key twice
TEST MODE COMMANDS
n105_test_mode.txt
a500_test_mode.txt
a530_test_mode.txt
KYOCERA
Qualcomm qcp-800 Nam Pogramming:
Nam Set: Menu+3+0+Spc
Field Test: Menu+7+0+Fsc
Kyocera 1135, 2255, 3035, 5135, 6035, Se47,
Nam Set: 111111+Jog Dial(Ok), Select “Programming”+Spc
CAI Change: ##7738,ok
Enable TTY: ##889,ok
Life Timer, PRL, etc: ##786,ok
A-key: ##2539,ok
A-key: 2539,ok
SANYO
Sanyo 4900, 5150, 5300, 8100, etc Nam Programming:
Nam Set: ##Spc+Ok+Key Down+Ok
Advanced Setup: ##3282+Ok+Key Down+Ok+Msl
A-key: ##2539+Ok+Key Down+Ok
Version: ##**837+Ok+Key Down+Ok
Debug Menu: ##FSC+Ok+Key Down+Ok
Airtime menu: ##8463+Ok+Key Down+Ok
Change CAI: ##7738+Ok+Key Down+Ok
Vocoder: ##8626337+Ok+Key Down+Ok
Reverse Logistic: ##786+Ok+Key Down+Ok
Set IP Address: ##2769737+Ok+Key Down+Ok
TTY On/Off: ##889+Ok+Key Down+Ok
Ready Link: ##4636+Ok+Key Down+Ok
Browser Init On/Off: ##4682+Ok+Key Down+Ok
Picture Token: ##25327+Ok+Key Down+Ok
Unknown Code: ##5282277+Ok+Key Down+Ok
(SPC=000000, FSC=040793)
Sanyo scp-A011, smp-A017, etc Nam Programming:
Nam Set: F9(3 beep) + 0*72696#767
NOKIA
Nokia 3280, 3285, 3580, 3585, 5185, 6185, 8280, etc
Nam Set: *3001#12345#
Software Version: *#837#
Software Version: *#9999#
Esn Number: *#92772689#
Restart Phone: *#75681#
Restart Phone: *#75682#
Nokia 8887
Nam Set: *3001#12345#
Version: *#0000#
Evrc: *#8378#
Esn/Data/Timer: *#92772689#
SID: *#743#
Nokia 8587
Nam Set: *#626#7764726#
A-Key: #8159357022#4579# (26 digits)
A-Key: #8159357022#4547# (20 digits)
Version: *#0000#
Version: *#837#
Vocoder: *#3872#
Change language: Menu 5, 3, 1
Change DM mode: *#7678#
debug Screen: *#8378#
Debug: *#8380#
Field Test Menu: *#83788#
SPC Unlock, Factory Reset:
Full Factory Reset: *#7370#
Resets all settings including non-user changeable items (like SPC)
NOKIA
51xx, 61xx, 71xx, 3285, 63xx, etc:
1) Turn on the phone. Press *3001#12345#
2) Scroll up to where it says “Field Test” and choose SELECT
3) Highlight “Enable” and choose OK. Turn the phone off then back on.
4) If the test mode screen does not show up press MENU and scroll
down to “Field Test” choose SELECT. Press 0 1 then choose OK.
5) Lower left or upper left number is the signal strength.
6) To turn off the test mode press MENU and scroll down to where it
says
“Field Test” choose SELECT. Press 0 0 and then choose OK.
3360, 6360:
1) Turn on the phone. Press *3001#12345#
2) Scroll up to where it says “Field Test” and choose SELECT
3) Highlight “Enable” and choose OK. Turn the phone off then back on.
4) If the test mode screen does not show up press MENU and scroll
down to “Field Test” choose SELECT. Press 2 1 0 1 then choose OK.
5) Lower left or upper left number is the signal strength.
6) To turn off the test mode press MENU and scroll down to where it
says
“Field Test” choose SELECT. Press 2 1 0 0 and then choose OK.
AUDIOX
Audiovox 4000, 9000, 9100, 9155, 9500, etc Nam Programming:
(Power the phone on and wait until the little light on top goes out)
Nam Set: 289+fcn+#+1
Service menu: fcn+00+fsc(000000)
Test Mode: Hold (2,*,Rcl)+Power
Test Mode Commands:
99 – download – flash phone
124 – inam data write
125 – version
126 – esn read
127 – sec_code
128 – lock_code
129 – is WFTV data write
137 – FSC code
138 – NPcode (nam program code)
139 – dscode
141 – restart
218 – Read_Addr
000 – is cdma mode
001 – is fm mode
002 – is pcs mode
008 – is reg read addr
020 – is lna_range
Audiovox pcx-3500xl
Nam Set: ##2726+Send+1998+1+Spc+1
Audiovox cdm-100, 130, 135, 8300, 8500, 8600,
Nam Set: ##20022002+Pwr+1+Spc
Audiovox 8610, 8910, etc Nam programming:
Name Set: ##847446, end, 111111
Audiovox-107 Nam Programming:
Nam Set: 45680*47*869#1
Audiovox CMP-3 Nam Programming:
Nam Set: 45680*47*869#1
Dm Mode: Menu, 6, 6
Audiovox 9950 Nam Programming:
Nam Set: ##3282
Audiovox Z800 (Audiovox 7900, Sharp) Nam Programming:
Nam Set: m + # + envelope key + * + 1
Audiovox Thera (Toshiba 2032) Nam Programming:
Thera Nam Programming User Manual – nam_thera.pdf
AUDIOVOX
9100, 9155:
1) Turn on the phone. As soon the phone comes on and the green light
turns off press RIGHTARROW, 0, 0. The phone will ask for the
“FSC Code”, press 000000 then choose OK and press RIGHTARROW,
RIGHTARROW. Your phone is now in test mode.
2) The signal strength is the number on the top right hand side of
the screen.
3) To turn off test mode shut of the phone and then turn it back on.
MOTOROLA
Motorola 7760, 7860, 2260, 8160, etc Nam Programming:
Nam Set: Fcn,0000000000000, Rcl
Nam Set: 74663#, Fcn, Fcn
Test Mode: Fcn, 00**83786633, St
Motorola v60c, v120c etc Nam Programming:
Nam Set: 74663#, Menu, Menu, Spc
Nam Set: Menu, 073887, * (type quickly)
Test Mode: Menu, 073887*, Spc
Debug Mode: ##33284
Force the phone into DIGITAL ONLY mode:
1) ##33284 (Debug)
2) RIGHT Softkey (Next) Twice
3) Down arrow 10 times to “PrefMod”
4) RIGHT Softkey (Change) until you see “DigOnly”
5) LEFT softkey (Exit)
6) MENU then LEFT Softkey return to idle screen
7) ##33284 (The last 4 will not display if you have done it
correctly)
Motorola t182, c210, :
Nam Set: ##1111 end
Nam Set: ##298645665 end
Short Nam: ##073887 sto
Motorola v710, v730, v740, ms150,:
Nam Set: 8378*# + press 3 times NATE (spc – 071082)
Test Mode: Menu, 073887*, Spc
Service Menu: #758353266#646#
Motorola StarTac 2004
Nam Set: 5759789*#, rec key (3)times (spc – 915037)
Motorola ms200, ms230, etc Nam Programming:
Nam Set: 5759789*# (spc – 915037)
Motorola v6060 Nam Programming:
Nam Set:147*369#456*0#
MOTOROLA
v60, c120, c331, etc:
1) Turn on the phone. Press MENU 0 7 3 8 8 7 *
2) The phone will require you to “Enter a Security Code”, press
000000, OK
3) Scroll down to “Test mode” choose SELECT. Scroll down to “Enable”
choose SELECT. Your phone is now in test mode.
4) Signal strength is the 3_rd number down on the left hand side of
the screen.
5) To toggle between regular mode and test mode: Press MODE then
quickly press the BUTTON DIRECTLY TO THE LEFT OF MENU.
6) To turn off the test mode the phone must be in regular mode, then
follow
the above sequence and scroll down to where it says “DISABLE”
instead of
“ENABLE” and choose select.
SK TELETEC
Sky All Models Nam Programming:
Nam Set: #7583538324#626#
Nam Set: *759#364*7388464#
Min simple mode: #758353266#646#
Irm simple mode #758353266#476#
Voice memo: #8767#277#
Test Mode: #7583538324#8378#
A-key: #758353266#2539#
Service Menu: Menu+4+0+Spc
Service Menu: Menu+5+0+Spc
WITHUS / MODOTTEL
Withus wce-100, 200, 300, etc Nam Programming:
Nam Set: ##948487+Save
Nam Set: ##948482+Save
Nam Set: ##66835+Save
SMS Settings: ##76766
NVM Rebuild: ##777464
HYUNDAI
Hyundai hwp-110 :
Nam Set: #86904**89397#
DM Mode: ##2740*
(Open phone, inter code, close phone)
Hyundai hgc-120, 130, 200 Nam Programming:
Nam Set: #86904**89397#
Hyundai hgc-310, 600, 610
Nam Set: ##20022002+Pwr+1+Spc Code
Field Test: ##20022002+Pwr+1+Master Code
Hyundai Curitel h-100, 150, hx-510b, 520 Nam Programming:
Nam Set: ##20022002+Pwr+1+Spc Code
Field Test: ##20022002+Pwr+1+Master Code
A-key: 2539**
Debug Menu: ##27732726+Pwr
Sar Test: ##27752345+Pwr
Baud Rate: ##36**+Pwr
DM Mode Enable: **1004+Pwr
DS Mode Enable: **1005+Pwr
Test Bell/Voice/Led/Dot: ##1122+Pwr
RF Mode: ##2240+Pwr
Ras Ram: ##2774+Pwr
Cmux1: **0481+Pwr
Cmux2: **0482+Pwr
RX Mode Fax: **0492+Pwr
RX Mode Data: **0491+Pwr
RX Mode Reset: **0490+Pwr
HUAWEI
Huawei ETS-668, 678, 688, etc Nam Programming:
Debug Mode: ##44+Menu
Debug Screen: ##33+Menu
CDG2 Test enable: ##234+Menu
CDG2 Test disable: ##432+Menu
China Lang Select: ##123+Menu
Blocking Debug Code: ###888+Menu
Home System Only On: ##461+Menu
Home System Only Off: ##460+Menu
ERICSSON
Ericsson A1228c, T61, etc Nam Programming:
Short NAM: 987+Menu
Long NAM: 923885+Menu+Spc
CDMA Mode: 904093+Menu
Analog Mode: 904095+Menu
QNC: 904097+Menu
Debug Screen: 904090+Menu
DM Mode: 904050+Menu
Sony-Ericsson T608 :
Nam Set: 923885, Joystick to the right, 111111
EPSILON / COMPAL
Epsilon vc-5x :
Nam Set: **147258963##
Programming1: **1232580##
Programming2: **321456987##
Version: **1470963##
Debug: **000000##
Menu_1: **078987##
Menu_2: **1234756##
A-key: 2539**
Reset: **14789##
VK MOBILE
VK-100C, 110C, 200C, etc Nam Programming:
Nam Set: 15314753974159
Test Mode: 153147539123258 (88 – clear efs)
<GIGA TELECOM>
Z510, Z710i(gcd-456) Nam Programming:
Nam Set: Menu+0+Spc
<<AnyDATA>>
AMC450 Nam Programming:
Nam Set: *74269#*748#96148063+SEL
GTRAN
Gtran gcp-2000 Nam Programming:
Nam Set: 01#737+Spc
Debug Menu: 01#324+Spc
Debug Mode: 01#727
Test Mode: 01#764+Spc
System Test Mode: 01#768+Spc
Gtran gcp-5000 Nam Programming:
Debug Mode: 01#727+Spc
Test Mode: 01#765
PANASONIC
1) Turn on the phone. Press #7764726# choose SEND
2) Scroll down to where it says “NAM 1″ and choose OK. Scroll down
to “Access To Level 4″ choose YES. Scroll down to “Built-In-Monitor”
and choose EDIT.
3) Press 1 and choose OK then choose BACK. The phone will say
“Back To Level 1″ choose YES. Now choose EXIT the phone will ask you
“Exit And Save Change” choose YES.
4 Signal strength is the top right number on the screen.
5) To turn off the test mode follow the above sequence except press 0
instead of 1 at the “Built-In-Monitor”
<<SYNERTEK>>
Synertek S200 Nam Programming:
Nam Set: Menu+0+Spc
Debug Mode:
Test vibro/rx/tx: ##5555+Save
Debug Screen: ##33+Save
Debug Screen: ##523+Save
RF Test: ####+Save
Unknown code: ##325+Save
<<SONY>>
Sony CM-M1300, 3300, Z200 Nam Programming:
Nam Set: 111111+Ok(Jog Dial)+Select+Programming+Ok+Spc
Samsung:
All type of phones (old modeles):
NAM programming: 47*869#08#9
Test mode: *759#813580 or 5809540*45680
exit test mode – 02
A-Key: menu + 0, code 25##
Samsung A500
1. Enter ## and the 6 digit OTKSL
2. SERVICE MENU will appear and 1.Basic will be highlighted
3. Press OK
4. Device will display NAM CDMA/ Phone Number
5. Enter 10 digit MIN
6. Press OK (3 times)
7. Display will return to Service Menu. Press END.
8. Programming is complete
Samsung N240 and N400
1. Enter ## and type in the 6 digit OTKSL
2. The display will show SVC MENU and 1. Phone Number
3. Press OK
4. Enter the 10 digit MIN and press OK
5. The display will show NAM with Home SID on the second line (Note:
SID is no longer used)
6. Press OK
7. The display will return to the SVC MENU
8. Press END to complete the programming
Samsung Uproar
1. Press MENU key
2. Enter 9 2 0
3. Enter the OTKSL
4. At SVC Menu screen press OK
5. Enter MIN and press OK 4 times
6. Enter SID (4654) and press OK
7. Press END key
8. Programming is complete
Samsung N300
1. Press ## followed by the OTKSL
2. SVC menu will be displayed
3. Press 1 for Phone #
4. Enter the 10 digit MIN and press OK
5. MIN that was entered will be displayed press OK
6. SVC Menu will display press 3 for NAM
7. Enter the 4 digit Home SID press OK
8. Press END and handset will power cycle
Samsung i300
1. Tap on the Phone Icon with stylus
2. Press #907*9#0 ENTER LOCK should appear on screen
3. ENTER OTKSL
4. SVC MENU will appear press 1
5. Enter 10 digit MIN and then press SAVE
6. Press SAVE again
7. Press 3 and then press SAVE 6 times
8. Enter the HOME SID and press SAVE once
9. Press END key twice
Samsung A400 and A460
1. Enter ## and OTKSL
2. Press 1 for Basic at MENU (1 of Phone # when using the MSL)
3. Enter 10 digit MIN and press OK
4. At 1.Basic Menu press the END key
5. Handset will power cycle
Samsung 3500 8500 6100 N200
1. Press MENU
2. Press 6 0 (3500) 8 2 0 (8500/6100/N200)
3. Enter OTKSL
4. Press 1 at SVC MENU Screen
5. Enter MIN and press OK
6. Press OK 4 times
7. Enter SID (4654) and press OK
8. Press END key
9. Programming is complete
Qualcomm:
QCP-800 programming: menu + 3 + 0.
SPC: “000000″ or may be other SPC typed by user.
QCP-820/1920/2035: type “111111″ and press Jog Dial.
Choose “Programming” and enter SPC: “000000″ or may be other SPC
typed by user.
QCP 1960 and 2760
1. Press softkey under the work MENU
2. Press 8 0
3. Enter the OTKSL
4. Press softkey for OK
5. Enter MIN and press softkey for OK
6. No SID is require for this handset
7. Press softkey for EXIT
8. Programming is complete
LG:
LGC-300 programming: menu + 9 and enter SPC: “000000″ or may be
other SPC typed by user
A-Key: press STO for some time while you can see special code enter
zone. Type 2539** and enter A-key
LGC-330W programming: menu + 4 + 0 and enter SPC: “000000″ or may be
other SPC typed by user.
A-Key: type 2539** and enter A-key
LGC-800W /500 programming: menu + 0 and enter SPC: “000000″ or may
be other SPC typed by user.
A-Key: type 2539** and enter A-key
LGC-510 programming: menu + 3 + 0 and enter SPC: “000000″ or may be
other SPC typed by user.
A-Key: type 2539** and enter A-key
LG1010 LG4NE1 TP2200 TP2100 Touchpoint SB/DB TP 1100 TP5200
1. Press ##
2. Enter the OTKSL
3. Scroll to SAVE and press OK
4. Scroll to MIN and press OK
5. Enter 10 digit MIN scroll to SAVE and press OK
6. Scroll to SID and press OK (Skip on 4NE1 go to RESET PHONE and
press OK to complete)
7. Enter SID (4654) and scroll to SAVE and press OK
8. Programming is complete
LG5350
1. Enter ## and enter the OTKSL and press the left soft key under
the word “Save”
2. At the Service Program display select Mobile Phone # and press
the OK in the center of the 4 way navigation key
3. Enter the 10 digit MIN and press OK
4. Scroll down to 4. Advanced and press OK
5. Scroll to NMSI and press OK
6. Enter the MSID and press OK
7. Scroll down to 9. Amps Phone # and press OK
8. Enter the MSID and press OK
9. Press the END key
TP 2100
1. Press ##
2. Enter OTKSL
3. Scroll to SAVE and press Roller Ball in for OK (ESN will display)
4. Select NEXT (by pressing in the roller ball)
5. Scroll to EDIT and press in the roller ball
6. Enter MIN
7. Scroll to SAVE and press roller ball in
8. Select NEXT at the next 3 screens and then EXIT
9. Programming is complete
TP3000
1. Press ##
2. Enter OTKSL
3. Scroll to SAVE and press OK
4. Open flip
5. Use Stylus to enter the 10 digit MIN
6. Press OK (No SID entry is required)
7. Programming is complete
TP 5250
1. Press ##
2. Enter the OTKSL
3. Scroll to SAVE and press OK
4. The phone display will read SVC Program
5. Scroll to MOBILE PHONE # and press OK
6. Phone display will read Mobile Phone Number
7. Enter the 10 digit MIN and press OK
8. Scroll to Home SID and press OK
9. Enter the 4 digit SID (4654) and press OK
10. Reset Phone will be highlighted. Press OK
11. Phone will reset
12. Programming is complete
LG V111(DM110)
[menu]30.
After ask lockcode, enter: 843691.
Ericsson:
Programming:
Shot NAM 987 + menu
Long NAM 923885 + menu and enter SPC: “000000″ or may be other SPC
typed by user.
CDMA mode 904093 + menu
Analog mode 904095 + menu DM mode 904959 + menu
Hyundai:
HGC-120E / -130E programming: #86904**89397#
HGC-600E programming: ##20022002, END and enter SPC: “000000″ or may
be other SPC typed by user.
Sony:
CM-M1300/3300/Z200 programming: type “111111″ and press Jog Dial.
Choose “Programming” and enter SPC: “000000″ or may be other SPC
typed by user.
Sony CM-M1300
1. Power phone on
2. Enter six “1s” ( 111111 )
3. Press the jog dial in
4. Press the jog dial in again to select programming
5. Enter six “0s” for the service security code
6. Phone displays the ESN
7. Press the jog dial in for OK
8. Enter your ten digit cellular telephone number
9. Press the jog dial in for OK
10. Enter your cellular carrier’s system ID (SID) without the zeros
(Example: if your carrier’s system ID is 00035, enter just 35)
11. Press the jog dial in for OK
12. Enter a name for NAM 1 or just press the jog dial in for OK
13. Phone displays Basic NAM 1 Programming is complete
14. Press the jog dial in
15. Press the jog dial in again for EXIT
16. Phone powers itself off
17. Press the power button to power the phone back on
18. Basic programming is complete
Motorola:
StarTAC 7760/7860
Service menu: FCN+0+000000+000000+RCL
Test mode: FCN 00**83786633 STO
V60c programming:
Service menu: 74663 # [Menu] [Menu] (programming code)
Test mode: [Menu] 073887 * (security code = 000000)
Motorola Tarpon (120x)
1. Press 74663 (spells PHONE)
1. Press # MENU MENU quickly
2. Enter OTKSL
3. The work MIN will be highlighted
4. Select the word CHANGE by selecting the top right button
5. Select DELETE. Press and hold the button until clear
6. Have the customer enter the 10 digit MIN number
7. Select OK with the top right button. The “User Activation” screen
will appear
8. Scroll to highlight the CDMA Sys ID
9. Select CHANGE by selecting the top right button
10. Enter SID
11. Select OK by selecting the top right button
12. Select DONE with the top left button
13. Press the END key
14. Press # MENU MENU quickly
15. Enter OTKSL
16. The work MIN will be highlighted
17. Select the word CHANGE by selecting the top right button
18. Select DELETE. Press and hold the button until clear
19. Have the customer enter the 10 digit MIN number
20. Select OK with the top right button. The “User Activation”
screen will appear
21. Scroll to highlight the CDMA Sys ID
22. Select CHANGE by selecting the top right button
23. Enter SID
24. Select OK by selecting the top right button
25. Select DONE with the top left button
Press the END key
Motorola Phones (ALL)
1. Enter 74663 # FCN FCN
2. Enter OTKSL
3. Enter MIN and press STO
4. Enter SID (4654) and press STO
5. Press STO again – programming is complete
Note: on the Tarpon (120C) you will need to press the MENU key
instead of FCN.
Nokia:
5185/6185 programming: *3001#12345#
Software version: *#837# or *#VER# or *#9999#
Serial / ESN: *#92772689# or *#WARRANTY#
Phone reset: *#75681# or *#75682#
Nokia 6185-5170
1. Press *#639#
2. Enter OTKSL and press OK
3. Enter the MIN and select OK
4. Enter the SID and select OK
5. Programming is complete
Nokia 3585
1. Enter ## followed by the OTKSL
2. Number (MDN) is highlighted. Press the upper left-hand soft key
to select
3. Mobile Number will display. Enter the 10 digit MIN
4. Press OK
5. IMSI will appear. Press and hold the Clear key until the display
is empty.
6. Enter 31000 plus the MSID (15 digits total)
7. Press the upper left hand soft key and select OK
8. It will take you back to the SVC Programming. Press the upper
right hand soft key to select EXIT
9. Press END.
10. Phone will power cycle and programming is complete.
NEOPOINT:
Neopoint 1000
1. Press M to display Main Menu
2. Scroll to PREFERENCES
3. Press softkey under SELECT
4. Enter 040793
5. Scroll to PROGRAMMING
6. Press softkey under SELECT
7. Enter OTKSL
8. Press softkey under DONE
9. Scroll to PHONE NUMBER
10. Enter 10 digit MIN
11. Scroll to HOME SID
12. Enter SID (4654)
13. Press softkey under SAVE to exit
14. Programming is complete
NEOPOINT 1600
1. Power the phone on
2. Press the “Menu” key
3. Scroll to “Preferences” – press “Select”
4. Key in the “Field Service Code” (the phone will not prompt you
for the code)
at the “preferences” screen to access the “Service” menu (Default
code is “000000″)
5. Scroll to “Programming” – press “Select” – the phone will ask for
the “Subsidy Lock Code”
6. Enter the “Subsidy Lock Code(654321)” to access the “NAM” menu
7. Select the NAM to be programmed (NAM 1 or NAM 2)
8. Program the NAM – Phone number and CDMA Home SID
9. After programming has been completed press “Save” – the phone
will reset
Handspring TREO:
1. Open the flip and press the PHONEBOOK button one time to display
the dial pad
2. Enter ## and the OTKSL using the numbers on the Dial Pad
3. Press the handset button shown in the diagram above
4. At the Activations screen enter the MIN in the phone number field
using the numbers on the device keyboard
5. Put a check in the Enable Number Portability box and type the
MSID in the MSIN field
6. Press OK
7. The device will display the network search pop-up and return to
the Phonebook display
Hitachi P300:
1. Enter ## and the 6 digit OTKSL
2. Press the Options soft key and then scroll to Save Phone #. Press
the OK soft key.
3. At the NAM display scroll to EDIT and press the OK soft key
4. Display will read NAM and MDN will be highlighted. Press the OK
soft key.
5. At the MDN display enter the 10 digit MIN and press the SAVE soft
key.
6. At the Save prompt press the OK soft key. The next display will
show several options that should not edited.
7. Press the EXIT soft key and the device will power cycle.
8. Programming is complete.
Sanyo:
Sanyo 4000 4500 4700 5000 6000
1. Press ##
2. Enter the OTKSL
3. Scroll to SAVE and press OK
4. ESN will be displayed – press OK
5. Enter 10 digit MIN and press OK
6. Enter SID (4654) and press OK
7. Press OK twice
8. Programming is complete
Sanyo 5150 5300 and 6400
1. Enter ## followed by the OTKSL
2. Press MENU SAVE PHONE #
3. Press Ok
4. SVC Programming will be displayed. Scroll and highlight Mobile
Number. Press OK
5. Press OK again
6. ESN will be displayed. Press OK
7. Mobile Number will be displayed enter the 10 digit MIN press OK
8. Press OK 4 times
9. Phone will power cycle
10. Programming is complete
Sanyo 6000
1. Press ##
2. Enter OTKSL
3. Press MENU Key and scroll to SAVE PHONE # and press OK
4. ESN will be displayed press OK
5. Enter MIN and press OK
6. Enter SID and press OK
7. Press OK twice more
8. Programming is complete
Sanyo 4900
1. Enter ## followed by the 6 digit OTKSL
2. Press the MENU/OK key and scroll and highlight SAVE PHONE #
3. Press MENU/OK
4. Scroll and highlight MOBILE NUMBER press OK
5. At the ESN display press OK
6. In the MOBILE NUMBER screen enter your MIN and press OK 4 times
7. At the service program menu scroll to exit and press the MENU/OK
key.
8. Programming is complete
Sanyo 6200
1. Enter ##
2. Enter OTKSL
3. Press the MENU key and scroll to highlight SAVE PHONE #
4. Press OK
5. Scroll and highlight MOBILE NUMBER
6. Press OK twice
7. Scroll and highlight EXIT
8. Press OK
9. Phone will power cycle
10. Programming is complete
Toshiba:
Toshiba 2032P
1. Slide the Radio Standby Switch on the left side of the device to
the upper side (ON) to activate the phone function. This is the
switch with the phone icon over it
2. After power up is completed use the stylus to tap on the ADMIN
pull up menu at the bottom of the screen and select ACTIVATION
WIZARD. If your device has not yet
been activated the ACTIVATION WIZARD will automatically start when
you turn on the radio in your device.
3. Tap NEXT 3 times. If the device has been previously activated it
will require only 2 presses.
4. On the fourth screen enter the 6 digit OTKSL using keyboard
5. Enter the MIN in both entery fields then tap NEXT
6. Wait for the device to initialize and display “ready to connect”
7. To initiate IOTA tap the word ADMIN at the bottom of the display
and then Data Provisioning
8. Programming is complete
*******
Here is a list of various codes to try out. Some may require an MSL
to be able to make full use of the functionality.
##2769737 [##BROWSER] – MiniBrowser Settings (2G)
##8626337 [##VOCODER] – Set Vocoder
##3282 [##DATA] – Setup Menu for Vision handsets
##8463 [##TIME] – Airtime Menu
##040793 – Debug Menu
##786 [##RUN] – Technical Information (be careful with this one, you
can reset the handset)
##932 [##WEB] – IP Address information (2G)
##889 [##TTY] – TTY On or TTY Off
##4357 [##HELP] – Help
alcatel
Master Codes
- 25228352
- 25228353
- 83227423 (TH3/4,BH4,BF5,BG3,BF3/4..)
###337*07# – master reset (with SIM)
###847# – factory reset (with SIM)
Alcatel 835 formating – **0102#
enol
mıtsubıshı
*#987*00# – Service menu
*#987*99# – Full reset
*#900# – SW version
fly bird
S688 – #*301#02# send – with SIM
menu:
7 – 10 – ok,
#*8000#, #*3676# (reboot repair)
V09, S1180 – *, 3 times down, 3 times up – service menu
huawai
MASTER SECURITY CODE
-309296
-3092
-9296
maxon
*#9922# – menu, reset (without SIM)
*#9900# – Software Version
*#9901# – Software Version (PBatch)

mıtsubıshı
hold * 476989 NS Lock Menu
hold * 482896 CP Lock Menu
hold * 574243 NS Lock Menu
hold * 967678 SP Lock Menu
hold * 362628 IMSI Lock Menu
hold * 787090 Lock net.level
hold * 787292 Lock net.level
hold * 3926 Shut Down…

powered by Blogger | WordPress by Newwpthemes